Tag Archives: Upcycling

Upcycling: Puzzle Piece Kids’ Clothes

IMG_4404

I made these trousers for Master One the other day.  Well.  I kind of cheated.  You see, my little boy has become a turbo-charged tank, crawling around the place like he’s on a serious mission.  His delicate baby clothes are being tested for toughness every day.  And they’re not doing too well.  In the toughness department, that is.

When his first pair of trousers developed a pair of holes, I was tempted to convert them to rags.  The upcycler in me knew better.  I cut off the holey knee sections of the trousers , leaving the top waist/bottom part (the red, top in the photo above) and the two trouser-leg bottoms (red trouser bottoms in photo).  I replaced the removed pieces with sturdy but soft fabric from my old corduroy jeans.

To minimise my sewing I cut the old jeans fabric to include the original inner-leg seams.  Then it was just a matter of cutting the width to match the original baby trousers pieces, with allowance for the outer-leg seams.  I matched the pieces together with right sides facing, sewed up the seams and zig-zagged the seam edges to finish.  Very simple.

Unfortunately I didn’t snap any pics of the process.  But I’ve started on some other kids’ clothes puzzle-piece mix ‘n’ match projects and photographed the cutting up and piecing together steps.

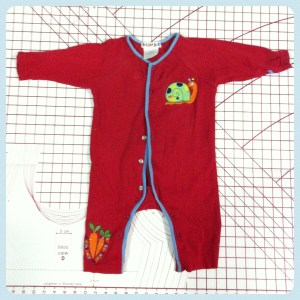
Baby jumpsuit becomes a shirt/jacket (I’d already cut the feet off these a while back thinking they could become a footless jumpsuit then discovered some holes in the legs, around the buttons).  I just need to hem the bottom.  

IMG_4394

IMG_4393

IMG_4395

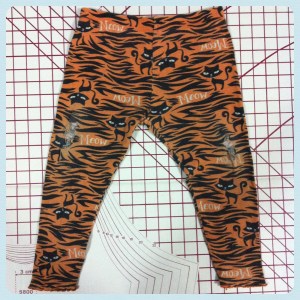
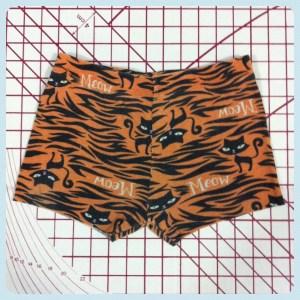
Pyjama (long) bottoms become pyjama shorts or undies (post-nappies).  Again a simple matter of hemming the bottom edges.  (Look at those holes in the legs!  Some heavy duty crawling has been going on here.)  There will be a use for the non-holey parts of the leg bottoms too.

IMG_4400

IMG_4401

IMG_4402

More of Master One’s handiwork – stains and holes again (see second photo).  Plus they were a bit short.  I’ll join them to the bottoms of the grey trousers to make a new pair with longer legs.

IMG_4397

IMG_4398

(Woops I’d already discarded – cut up for stuffing – the removed crutch section of these grey trousers before taking photos. They belonged to Miss Four before she wore some holes in the rear!  I’d attempted a repair initially but it came apart after one wear!)

IMG_4396

IMG_4399

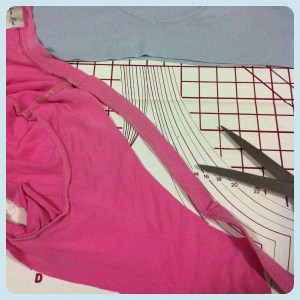
This final one might be interesting.  But I’ll see how it turns out.  I actually cut the grey  women’s T-shirt up to make T-yarn (the centre piece was used to make this) so was left with some scrap fabric which I cut up for the skirt below.  The pink T-shirt fabric was also left over from making T-yarn.  I’ll try to piece them together with the top of the grey trousers from the pic above.  

IMG_4403

IMG_4405

IMG_4406

IMG_4407

Hopefully the overlocker for which I’m excitedly waiting, will make the joining together of these stretchy fabrics much easier.  I’ll post some photos of the finished pieces when I’m done.  Just to show that they don’t look totally ridiculous.

Advertisement

1 Comment

Filed under Green Craft, Kids Stuff

Becoming a Green Crochet Queen

Are you a crochet queen or a knittaholic? I’ll admit to being neither although I’m aspiring to be the former lately. I was taught the basics of crochet and knitting as a youngster. My mum is a champion of both crafts but she’s particularly talented with a crochet hook. So was her mum and grandma and aunty. Here is a photo of Miss L in the christening gown my mum crocheted for me when I was a baby.

Miss L donning Mum's crochet christening gown

I witnessed a lot of crocheting when I was growing up. After making a scarf for my teddy (did you start with a scarf too?) I resigned. But soon after my crochet queen greaty aunty passed away last year, I found myself taking up the hook once more. I purchased a bulk lot of preloved crochet hooks and some yarn leftovers on ebay and got started with some granny square fun (and frustration) via the amazing and inspirational Pip Lincolne and her book ‘Meet Me at Mikes‘ together with Pip’s excellent granny square video tutorials. The online crafting world is incredibly generous with sharing knowledge and ideas. So even though I don’t have the luxury of having my mum or my grandma or great aunty sitting next to me guiding me through the process I’ve been able to tackle this new skill with some confidence.

Crochet hooks in fabric roll holder

I love all kinds of crafting, but what I particularly love about crochet is the peace and quiet (not even a click-clack). Being able to create something lovely and useful without making a sound is quite rare. It’s a wonderful way to relax and unwind after a challenging day. And if you like a bit of telly or film, you can watch that at the same time. (I’d avoid any distraction whatsoever whilst learning though!) Another awesome thing about crochet is that it’s so portable. Just one small hook and a ball of yarn and you’re good to go. I keep my latest project in a little cotton bag ready to take with me. And there is no shame in crocheting in public. I’m quite happy to be judged by onlookers as being a bit old-fashioned. I reckon people waiting in doctor’s surgeries would be a whole lot happier too, if they could while away the time with crochet.

Crochet cushion cover in the making

Crochet also happens to be a very green craft. It requires minimal equipment which is easily obtained second hand and is made to last. It doesn’t require any electricity. And it lends itself to re-using all sorts of materials, as well as sustainable natural fibres.

Crochet iPad cover using yarn remnants

Crocheting with plastic bags is nothing new to me. Anyone who grew up in Australia in the 70’s or 80’s must have seen some kind of bread bag crochet creation before. But do an online search for ‘plarn’ (plastic yarn) and you’ll be astounded at what some clever crafters have come up with. Here’s a cool clip showing how to make yarn from plastic bags. Then there’s t-yarn (made by cutting up an old t-shirt), VCR tape yarn, old sheets (and other fabrics) yarn and reclaimed yarn (from unravelling old knitwear). As well as making your own yarn, there are commercially available recycled yarns, including 100% cotton made from recycled denim, and acrylic yarn containing a percentage of recycled plastic. Amazing. There are also many smaller online businesses (including on ebay and Etsy) that sell reclaimed yarn produced by unravelling garments, T-yarn, and silk from saris. Incase you don’t have the time or patience to do it yourself.

The Red Thread: How to Make Fabric Baskets The Etsy Blog: How to Make Plarn and Crochet an Eco-friendly Tote Bag

Enter the world of eco-friendly yarns and you’ll also find organically produced natural fibres, including cotton and wool as well as the lesser known flax, hemp and nettle. All of which are made with minimal environmental impact. Do a bit of googling and you’ll be pointed in the appropriate direction. Remember your local charity store and ebay for all kinds of yarn leftover goodies, too.

I’m pretty pleased that I’ve taken up this craft again. Whenever I reach for my hook and yarn…or plarn…or t-yarn…I imagine my great aunty J is watching down on me with a huge grin. Yes, no doubt she’s proud that her beloved craft is being carried on to another generation. And she must be delighted that the art of thrift is making a resurgence. But largely her joy would have to come from the comedy that is seeing me fumbling away at the pace of a snail but the determination of a bulldog. I’m still learning. But I’m getting there.

4 Comments

Filed under Green Craft

Weekly Upcycling Inspiration: Denim Jeans

Welcome to your weekly serving of upcycling inspiration!  Once a week I’m going to feature an item for which I’ll endeavour to list some upcycling ideas.  They might be my own or they might just be little light bulbs of genius that I pinch from someone else.

OK.  So everyone must have a pair of old, no-longer-fit-to-wear, denim jeans in their wardrobe.  Right?  Well, get them out of the closet and do something with them!  Here’s a list of some clever projects to direct you to that something. (And not one of them involves cutting the legs off and turning them into shorts.  I promise.)

English: Young woman modelling a pair of denim...

1. To start you off, here is a useful guide on deconstructing a pair of denims for sewing projects.

2. Make a pocket board.  Remove pockets (from multiple pairs of jeans), attach them to a fabric covered board, and they become a handy storage place for small items.  Here’s one that Sew Daily already prepared for us.

3. Create a bag.  There are soooo many ideas for these online.  Take a look at a few: here, here and here.

4. Pop over to Makezine and learn how to sew a storage basket with jeans legs.  I’ve made one.  Why don’t you try too?

Upcycled jeans storage basket

5. Whip up some super cool bunting.  Simply cut out your triangles with pinking shears and join with bias binding or cotton tape.

6. If they still fit around the butt, but need a bit of extra length because someone’s little legs are growing up, up, up…add some gorgeous fabric at the leg-ends.  Take a look at these.  Cute.

7. Cut off the seams and make a bangle bracelet with Mich L. in L.A.  So simple!

8. Make a skirt.  Here’s one for a youngster, from Comfy Pretty.  And here’s another that could be used for a big girl too.

9. Make a hat.  Thoughts From a Seamstress doesn’t provide instructions…but she does give a pattern number and step-by-step photos.

10. Make a pair of slippers, via this how-to at The Guardian.

11. Make an apron.  A Girl and a Glue Gun shows you how.

12. Make some drinks coasters.  Just cut out two 10cm squares of denim, sew around the edge with right sides together, leaving a 5cmish gap for turning.  Turn inside out (so right sides are facing out), stitch the opening to close it and top-stitch around the border if you like.  Or…just zig zag the two squares together (wrong sides facing) for a rough look.

13. Make a tablet cover.

14. Make a knitting needle case.

15. And finally, more denim ideas …from Martha.

It seems a pair of old jeans can be re-hashed into just about anything.  So go on.  Get yours out…and get making.

Leave a comment

Filed under Green Craft

Weekly Upcycling Inspiration: The Tin Can

Welcome to your weekly serving of upcycling inspiration!  Once a week I’m going to feature an item for which I’ll endeavour to list some upcycling ideas.  They might be my own or they might just be little light bulbs of genius that I pinch from someone else.

Craft tool cannister

This week I’m featuring the tin can (also referred to as the steel can or just plain old can or tin).  Steel is 100% recyclable, and although considerably less energy is required to produce steel from recycled cans (75% less than making it from scratch, in fact)  it takes only a little bit of your energy to transform a can into another very useful thing.   (Check out some tips on recycling cans here.)

Pencil holders: cans covered with origami paper

1. Decorate (or not) with pretty or interesting papers (old maps, music sheets, wrapping paper, etc), paint, fabric or old buttons, and use as canisters to house all kinds of items – pencils and pens, paintbrushes, scissors, tape, rulers, knitting needles, crochet hooks.  Take a peek at these clever storage ideas here and here.

2. Turn into pots for plants.  Make drainage holes in the base first, using a drill with a drill bit designed for metal. Decorate or leave plain.  I tend to go for the natural look as the rust that develops adds charm.  Or you might like to leave the label on.  Any steel can is fair game – large or small, round or square.  The small tuna-type cans make cute little pots for succulents, which survive with minimal soil as their roots are so shallow.  Large cans, such as those for olive oil or Milo, make excellent pots for herbs.

Succulent in tuna can (this one was already coloured by the manufacturer)

Scented geranium in old Milo can

3. Use the top rim to make little picture frame magnets.

4. Make percussion instruments for youngsters.  For drums use larger cans with lids (and let your child bang away with whatever is on hand…hopefully something like a wooden spoon or chopstick).  Or cover a lid-less can with a section of old balloon or baking paper and secure with a rubber band.  If filled with dried pulses, rice, bottle caps – those sorts of things that will make noise when tossed inside a steel can – it can double as a shaker.  Go over to Mini Eco for a colourful version using ordinary tin cans.  Or be inspired by this too cool for school drum kit featured on Little Lovely.

5. Create a tin can lantern or try your hand at candle making (preferably using old candle scraps or beeswax) and use the can for a container candle or home-made citronella candle.  When it comes to melting the wax, you can even use a tin can to melt the wax in (as the part of the double boiler) so you don’t ruin a precious bowl.

6. Make a tin can telephone with the kids.

7. Need a height advantage?  Fashion a pair of can stilts.

8. Use as a round cookie cutter by removing the lid and base or make into custom shaped cookie cutters via Mother Earth News.

9. Stock-up the kids’ play kitchen.  Be sure to select cans that have a smooth edge where the lid was removed (or expect your bandaid stash to dwindle).  Wash carefully, leaving labels on.  You might be able to replace the lid (if removed with a can-opener rather than a ring-pull) and secure with glue, for authenticity’s sake (trust me…your child will think you are VERY clever)!

10. Make pigeon holes by glueing several cans together and placing them on their sides.  

What can you do with an old can?

Leave a comment

Filed under Green Craft, Living Green

Weekly Upcycling Inspiration: The Bread Clip

Welcome to your weekly serving of upcycling inspiration!  Once a week I’m going to feature an item for which I’ll endeavour to list some upcycling ideas.  They might be my own or they might just be little light bulbs of genius that I pinch from someone else.

This week’s star is the humble bread clip (or bread tag if you’d prefer).  Gosh…to think how many of these the world produces and then waves goodbye to once the little plastic things have performed their intended function!  And they can be quite harmful to animals or children who ingest them.  It makes me shudder…so I won’t think about that.  Instead lets ponder what to do with them after they’ve held our plastic bread bags closed for a little while.  Be sure to store them in a handy jar so you can easily add to the collection or reach for one when you need it.

IMG_3773

 1.  Use to hold short pieces of yarn or string.  You know those pieces I mean…the ones that are too long to discard but too short to be wrapped into a ball.  Keep the yarn/string-wrapped bread tags in a glass jar for easy location of that bit of string or yarn you need.  (I actually came up with this idea a few days ago when I was sorting and tidying my yarn.  I thought I was quite clever and original.  Until I searched Pinterest and discovered someone else had already thought of it. Of course!)

IMG_3775

2.  My husband  suggested this would be a useful way to store short sections of pre-made fishing rigs (eg, with hook, sinker, swivel and leader line) – wrap the leader line around in  a similar way to the yarn above, and secure the hook in the ‘mouth’ of the bread tag.

3. Label electrical cords when you have multiple cords in the one power point or power board.  This is particularly handy for computers and their associated paraphernalia…but I’ve labelled our kettle and toaster cords this way so I don’t get confused.  Also use to hold single thinner cords together when wrapped in a bundle.

4.  This fashion designer made her wedding dress out of 10 000 bread clips.  Very clever.  I’m not suggesting you do this…but these are the possibilities people!!

5.  Store a collection of elastic bands or hair bands.

6.  Make interesting mosaic-style artworks and use for craft – eg, bread clip figures, jewellery, and mobiles.  Here is a sweet bread tag charm necklace for kids to make.  (But please keep bread clips away from little ones who might be inclined to swallow them.)

7.  Mark the end a roll of sticky tape…you know…the end that you can’t locate until you’ve turned the roll full-circle at least three times.

8.  Clip a pair of socks together in the wash…so the sock fairy can’t run off with one.

9.  Fasten opened plastic bags containing food.  Close and label paper gift bags (perhaps after decorating with paint or marker pens).

10. Mark stitches in your knitting or crochet.

11.  Label spare keys.

12.  Fix your thong (if you live outside Australia read: ‘flip flop’!) if its splitting where the strap part comes through the sole.  Simply clip around the base of the strap, on the sole side.

13.  Use as a plectrum.

Going a bit too far with the latter?  OK I’ll stop there…but I’m sure it would work quite well.  And I’m sure I’m not the only one who’s thought of it.

What else can you think of?

Leave a comment

Filed under Green Craft, Living Green