Monthly Archives: May 2013

Weekly Upcycling Inspiration: The Cardboard Box

Welcome to your weekly serving of upcycling inspiration! Once a week I’m going to feature an item for which I’ll endeavour to list some upcycling ideas. They might be my own or they might just be little light bulbs of genius that I pinch from someone else.

Cardboard boxes are incredibly useful for their intended purpose of storage and transport of goods. And they can be reused in this way over and over again. Plus they are completely recyclable and biodegradable (minus any sticky tape). We love cardboard boxes in our household as they are a wonderful resource for kids play. There is always a supply on hand ready for a rainy day!

1. If you haven’t visited my Makedo Creations page yet, then go on, take a peak. I hope you’ll be inspired by what my husband and daughter have made with boxes and other recyclables and trash. Here is their latest creation…a checkout.

20130527-025039.jpg

20130527-030027.jpg

20130527-030305.jpg

20130527-030337.jpg

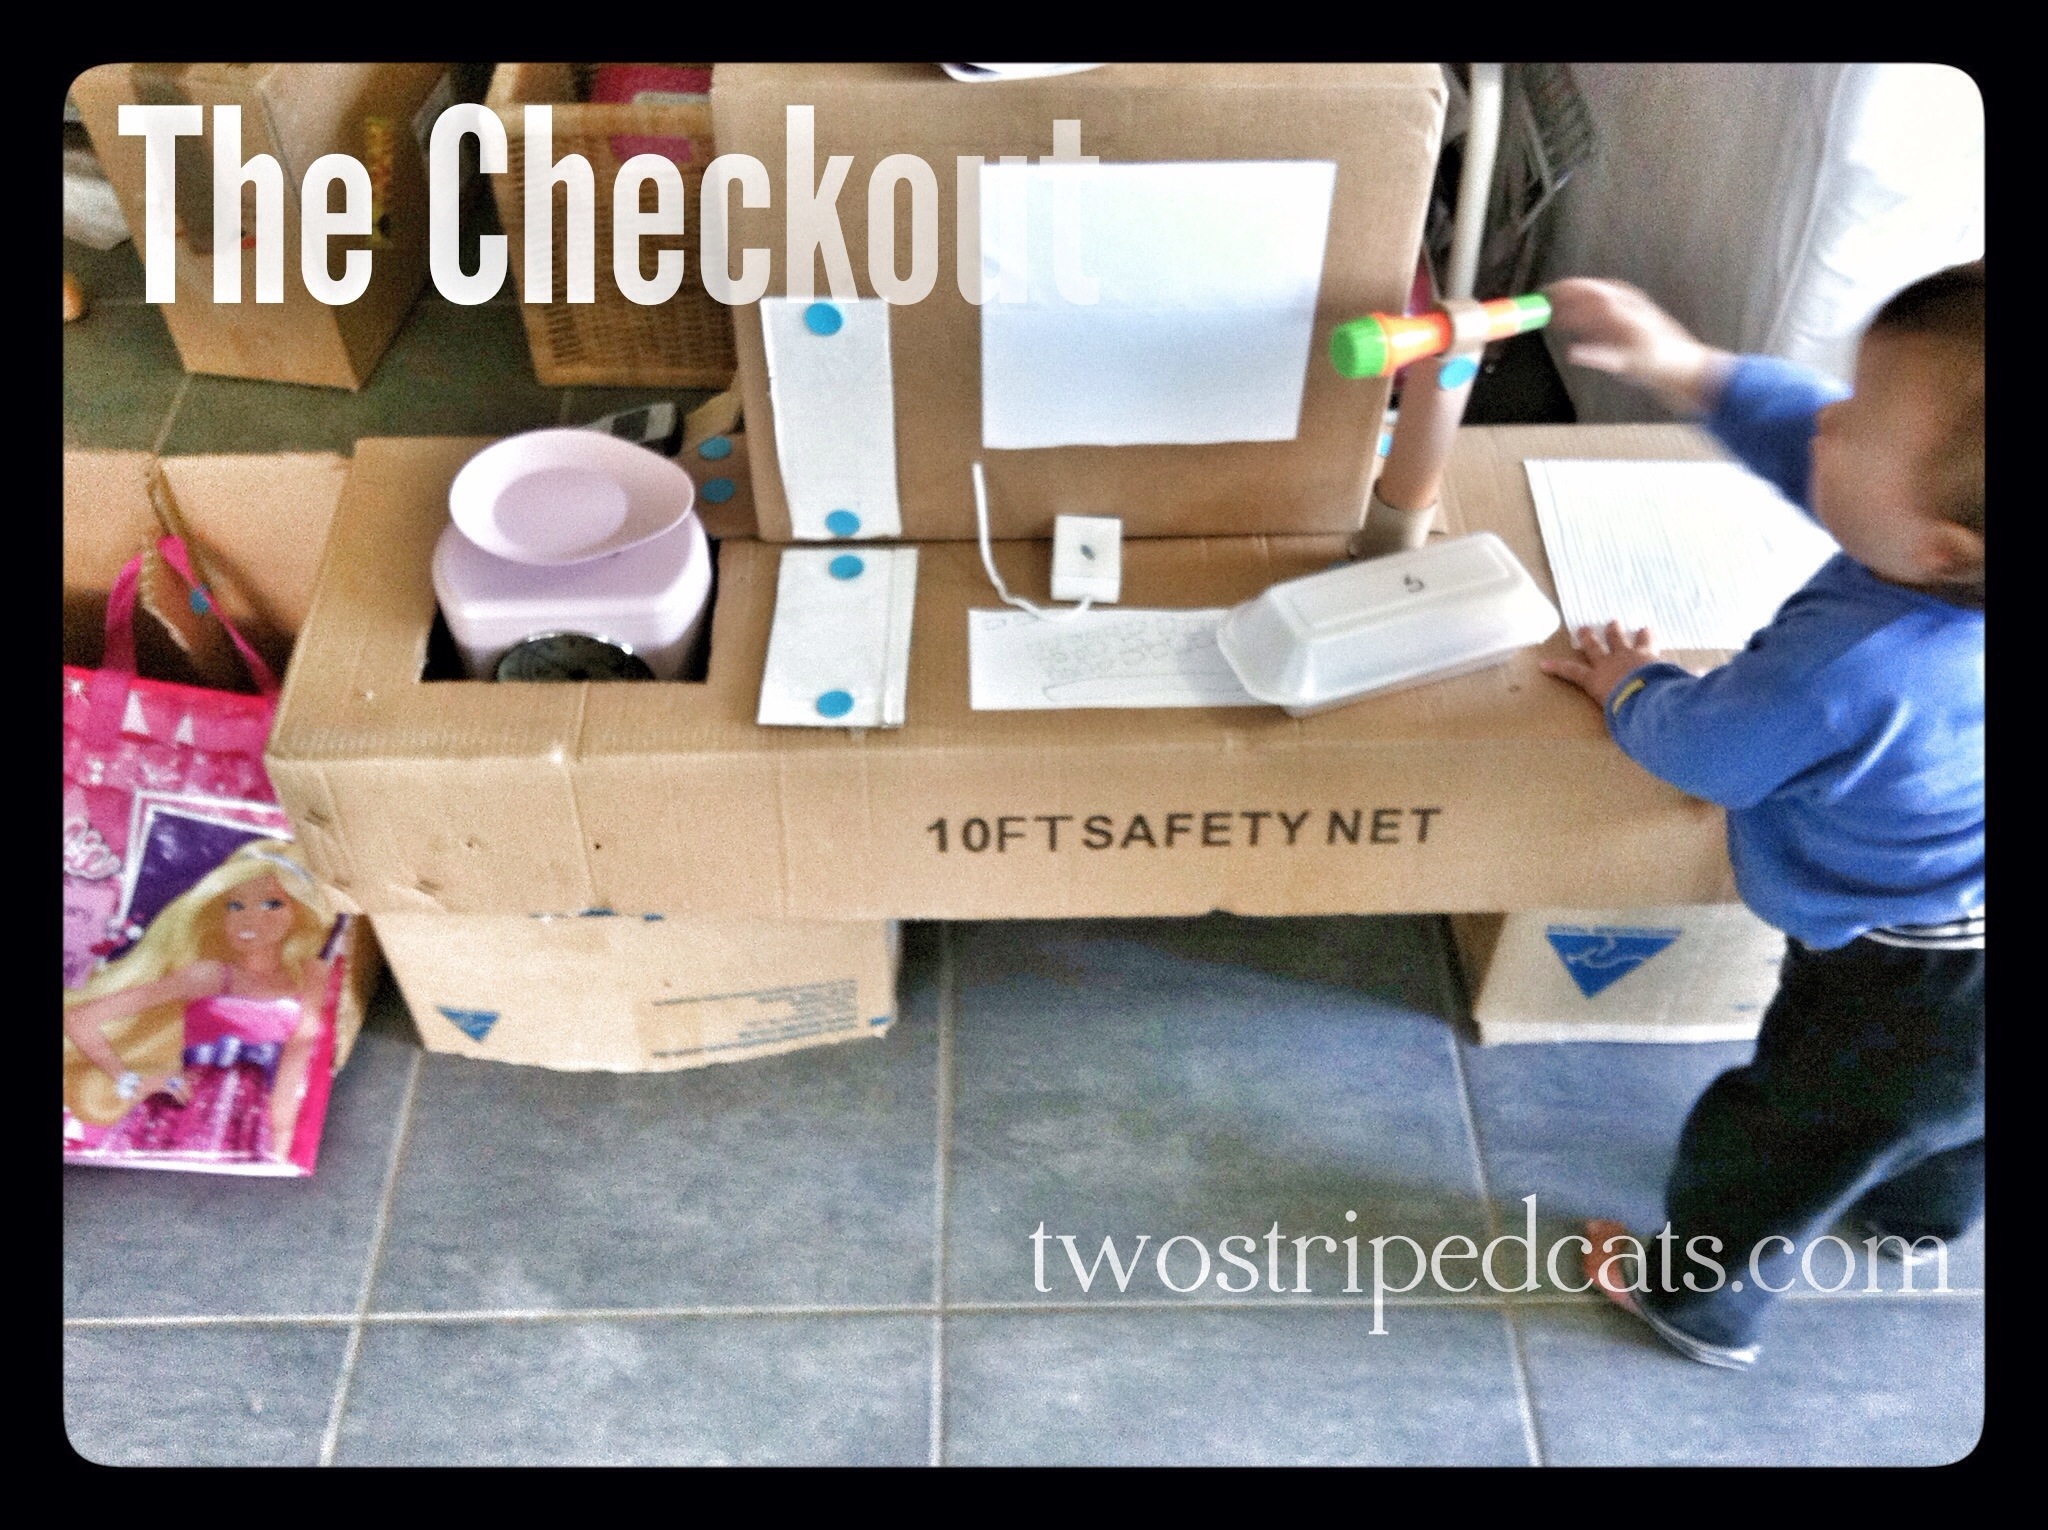
Complete with conveyor belt, scanner, monitor, scales, eftpos machine and packing area it’s been a popular play area for the children for the past couple of weeks. It uses only boxes and Makedo connectors plus an old mobile phone (eftpos machine) and real scales.

2. Use to suppress or kill weeds and grasses under a thick layer of mulch. Overlap pieces of opened out cardboard box on the area to be mulched, wet down then apply mulch. This is also a great way to smother grasses when building a no-dig garden bed or other raised garden beds onto a patch of lawn.

3. When wrapping odd-shaped gifts place the items in a box then wrap (reuse wrapping paper and other papers, fabric, etc). It will be much easier and neater.

4. Make an office in-box by cutting off one large side and the top. Cut the end of the narrow sides on an angle. Cover in decorative or interesting paper or fabric.

5. Make a magazine holder with a sturdy cereal box.

6. Place strategically under furniture when rearranging it, to protect the floor and make it easier to slide.

7. Entertain your pooch. Fill smaller boxes such as cereal boxes with dry dog food or treats, close then give to your dog to rip apart. This is a fabulous way to feed an active or young dog who needs lots of stimulation. Rather than gobbling up the food in a flash, your dog will spend extra time extracting the food and tearing up the box. The pieces of torn cardboard can later be placed on the compost.

8. Make a sled for snow or a grassy slope.

9. Protect fingers when hammering a nail. Push the nail through one end of a rectangular-ish piece of cardboard and hold onto the other end once you commence hammering. Remove cardboard then complete the hammering if necessary.

10. When transporting furniture and household items in a vehicle or trailer, use pieces of cardboard box placed flat against the items to protect against damage from rubbing and to help hold them in place. Use small pieces under ropes, again to stop rubbing but also to help secure the items when the rope is tightened.

Of course if you are a cat (or live with one) then you know what the best use for a cardboard box is, don’t you? No need to waste precious energy on upcycling. đŸ™‚

2 Comments

Filed under Green Craft, Kids Stuff, Living Green

Becoming a Green Crochet Queen

Are you a crochet queen or a knittaholic? I’ll admit to being neither although I’m aspiring to be the former lately. I was taught the basics of crochet and knitting as a youngster. My mum is a champion of both crafts but she’s particularly talented with a crochet hook. So was her mum and grandma and aunty. Here is a photo of Miss L in the christening gown my mum crocheted for me when I was a baby.

Miss L donning Mum's crochet christening gown

I witnessed a lot of crocheting when I was growing up. After making a scarf for my teddy (did you start with a scarf too?) I resigned. But soon after my crochet queen greaty aunty passed away last year, I found myself taking up the hook once more. I purchased a bulk lot of preloved crochet hooks and some yarn leftovers on ebay and got started with some granny square fun (and frustration) via the amazing and inspirational Pip Lincolne and her book ‘Meet Me at Mikes‘ together with Pip’s excellent granny square video tutorials. The online crafting world is incredibly generous with sharing knowledge and ideas. So even though I don’t have the luxury of having my mum or my grandma or great aunty sitting next to me guiding me through the process I’ve been able to tackle this new skill with some confidence.

Crochet hooks in fabric roll holder

I love all kinds of crafting, but what I particularly love about crochet is the peace and quiet (not even a click-clack). Being able to create something lovely and useful without making a sound is quite rare. It’s a wonderful way to relax and unwind after a challenging day. And if you like a bit of telly or film, you can watch that at the same time. (I’d avoid any distraction whatsoever whilst learning though!) Another awesome thing about crochet is that it’s so portable. Just one small hook and a ball of yarn and you’re good to go. I keep my latest project in a little cotton bag ready to take with me. And there is no shame in crocheting in public. I’m quite happy to be judged by onlookers as being a bit old-fashioned. I reckon people waiting in doctor’s surgeries would be a whole lot happier too, if they could while away the time with crochet.

Crochet cushion cover in the making

Crochet also happens to be a very green craft. It requires minimal equipment which is easily obtained second hand and is made to last. It doesn’t require any electricity. And it lends itself to re-using all sorts of materials, as well as sustainable natural fibres.

Crochet iPad cover using yarn remnants

Crocheting with plastic bags is nothing new to me. Anyone who grew up in Australia in the 70’s or 80’s must have seen some kind of bread bag crochet creation before. But do an online search for ‘plarn’ (plastic yarn) and you’ll be astounded at what some clever crafters have come up with. Here’s a cool clip showing how to make yarn from plastic bags. Then there’s t-yarn (made by cutting up an old t-shirt), VCR tape yarn, old sheets (and other fabrics) yarn and reclaimed yarn (from unravelling old knitwear). As well as making your own yarn, there are commercially available recycled yarns, including 100% cotton made from recycled denim, and acrylic yarn containing a percentage of recycled plastic. Amazing. There are also many smaller online businesses (including on ebay and Etsy) that sell reclaimed yarn produced by unravelling garments, T-yarn, and silk from saris. Incase you don’t have the time or patience to do it yourself.

The Red Thread: How to Make Fabric Baskets The Etsy Blog: How to Make Plarn and Crochet an Eco-friendly Tote Bag

Enter the world of eco-friendly yarns and you’ll also find organically produced natural fibres, including cotton and wool as well as the lesser known flax, hemp and nettle. All of which are made with minimal environmental impact. Do a bit of googling and you’ll be pointed in the appropriate direction. Remember your local charity store and ebay for all kinds of yarn leftover goodies, too.

I’m pretty pleased that I’ve taken up this craft again. Whenever I reach for my hook and yarn…or plarn…or t-yarn…I imagine my great aunty J is watching down on me with a huge grin. Yes, no doubt she’s proud that her beloved craft is being carried on to another generation. And she must be delighted that the art of thrift is making a resurgence. But largely her joy would have to come from the comedy that is seeing me fumbling away at the pace of a snail but the determination of a bulldog. I’m still learning. But I’m getting there.

4 Comments

Filed under Green Craft

Weekly Upcycling Inspiration: Denim Jeans

Welcome to your weekly serving of upcycling inspiration!  Once a week I’m going to feature an item for which I’ll endeavour to list some upcycling ideas.  They might be my own or they might just be little light bulbs of genius that I pinch from someone else.

OK.  So everyone must have a pair of old, no-longer-fit-to-wear, denim jeans in their wardrobe.  Right?  Well, get them out of the closet and do something with them!  Here’s a list of some clever projects to direct you to that something. (And not one of them involves cutting the legs off and turning them into shorts.  I promise.)

English: Young woman modelling a pair of denim...

1. To start you off, here is a useful guide on deconstructing a pair of denims for sewing projects.

2. Make a pocket board.  Remove pockets (from multiple pairs of jeans), attach them to a fabric covered board, and they become a handy storage place for small items.  Here’s one that Sew Daily already prepared for us.

3. Create a bag.  There are soooo many ideas for these online.  Take a look at a few: here, here and here.

4. Pop over to Makezine and learn how to sew a storage basket with jeans legs.  I’ve made one.  Why don’t you try too?

Upcycled jeans storage basket

5. Whip up some super cool bunting.  Simply cut out your triangles with pinking shears and join with bias binding or cotton tape.

6. If they still fit around the butt, but need a bit of extra length because someone’s little legs are growing up, up, up…add some gorgeous fabric at the leg-ends.  Take a look at these.  Cute.

7. Cut off the seams and make a bangle bracelet with Mich L. in L.A.  So simple!

8. Make a skirt.  Here’s one for a youngster, from Comfy Pretty.  And here’s another that could be used for a big girl too.

9. Make a hat.  Thoughts From a Seamstress doesn’t provide instructions…but she does give a pattern number and step-by-step photos.

10. Make a pair of slippers, via this how-to at The Guardian.

11. Make an apron.  A Girl and a Glue Gun shows you how.

12. Make some drinks coasters.  Just cut out two 10cm squares of denim, sew around the edge with right sides together, leaving a 5cmish gap for turning.  Turn inside out (so right sides are facing out), stitch the opening to close it and top-stitch around the border if you like.  Or…just zig zag the two squares together (wrong sides facing) for a rough look.

13. Make a tablet cover.

14. Make a knitting needle case.

15. And finally, more denim ideas …from Martha.

It seems a pair of old jeans can be re-hashed into just about anything.  So go on.  Get yours out…and get making.

Leave a comment

Filed under Green Craft

Weekly Upcycling Inspiration: The Egg Carton

Welcome to your weekly serving of upcycling inspiration!  Once a week I’m going to feature an item for which I’ll endeavour to list some upcycling ideas.  They might be my own or they might just be little light bulbs of genius that I pinch from someone else.

Two Striped Cats: Egg Carton

This week it’s the egg carton in the limelight.  What a cleverly designed bit of cardboard!  Almost as impressive as the little parcels of goodness that they are meant to protect.  I have trouble letting go of egg cartons because they are just so useful.

If you’re lucky enough to keep your own hens then the best and most obvious use is sorted.  In fact at peak laying time you’ll probably be begging your friends and family for egg carton donations!  Apart from re-using them over and over again for their intended purpose, here’s what else you can do.

1. Organise and store all kinds of goodies:

sewing supplies such as bobbins, safety pins, buttons, thread, small lengths of ribbon;

– small craft supplies;

stationery supplies;

– christmas ornaments, especially fragile glass baubles;

– decorated Easter eggs (real ones that have been blown);

Two Striped Cats: Decorated Carton Housing Dyed Eggs

– jewellery –  ideal for kids.  Here is a cute jewellery box project for kids, from B-Inspired Mama;

– hair accessories – clips, hair bands and bobby pins;

– a child’s rock collection;

– hardware – nuts, bolts, washers, screws, tacks;

– small plastic toy animals or dolls.  This cute one over at LilyBean’s Paperie has been decorated to hold plastic farm animals for a gift.

Not only will the compartments keep small items safe and locatable, the cartons stack for easy storage into boxes, drawers or on shelves.  You might like to decorate them first with paint or paper.

2. Plant seeds – fill each compartment with seed raising mix, sow the seeds, and water-in.  Once the seedlings are large enough, cut the carton up into individual cells then transfer them to the garden, still in their section of carton.  The roots will be protected from damage during the transplantation process and the carton will break down in the soil.

3. Make some play eggs (crochet, fabric, modelling clay, etc) and store them in an old egg carton.  Or just keep an empty egg carton in the play kitchen.

Two Striped Cats: Crochet Eggs

4. Use to package mini muffins and other small treats that you’ve made for gifts.  Decorate first by painting or covering in pretty or interesting papers.

5. Make a pair of goggles for kids play.

6. Use for kids craft.  

7. Create these sweet buttons by Pretty Little Things.

8. Turn into a kids’ paint palette by placing a dollop of paint in each compartment (you might like to leave some empty for mixing colours).  The paint will eventually dry up (but not before that masterpiece is produced) and the palette can be used again.  Or allow your child to colour the carton with any left-over paint, once the other artwork is complete, and turn it into a storage container.

9. Make a colour sorting game for toddlers or preschoolers.  Or an egg carton counting game.

10. Use as a favour bag at a childrens’ birthday party.

Check out these pics on Flickr for some more ideas!

Happy upcycling!

Leave a comment

Filed under Green Craft, Kids Stuff

Homemade Spread for Your Bread

Do you fancy a little spread on your bread?  I do.  But I didn’t always.  For a long time I took the healthy option and went without.  Even on toast.  Even with vegemite.  Then my first child started eating toast…and sandwiches…and it all went out the window.  I began applying a yellow slather of butter or marge to any serving of bread or biscuit, even if it was to be spread with another kind of spread that really could hold its own because it’s so full of oil anyway.  (I’m talking peanut butter and friends).  Now I can’t go without it myself.

Here’s the dilemma though.  I love the taste of butter (I actually mean real butter…you know, the kind that was once cream) but it is quite naughty.  Not fantastic for the arteries.  And it needs a little work before it can be applied to bread in a cooperative way.

Then there’s margarine.  Now margarine has had its share of bad press because of its high content of trans fats (these are unhealthy fats disguising themselves as the good guys) from hydrogenated vegetable oils.  According to the Heart Foundation, the levels of trans fats in margarines in Australia are actually low (a result of the Heart Foundation pressuring manufacturers years ago).  It’s a different story though in many other countries, especially the United States.  But, for Australians it seems the healthy option (other than opting out) is margarine.  Here’s an excellent summary of butter versus margarine by Australian nutritionist, Catherine Saxelby.

Back to the dilemma.  I could cope with choosing margarine over butter if it was only about the taste.  I could tolerate margarine.  But I can’t tolerate it.  Unfortunately, it seems most margarine-type products in Australia (including spreadable butters and olive oil spreads) contain palm oil.  (Check out this useful guide about which products are palm oil free…or not).

So for me, it’s either abstain – which I’m sure my body would thank me for – or choose healthier and orangutan-friendly options.  Here are some ideas on what to use instead of butter and marge:

1.  Avocado – superior nutritional value and comes pre-wrapped in it’s own biodegradable packaging.  And if you haven’t tried avocado and vegemite you’ve been missing out!

2.  Nut butters – peanut, cashew, almond and hazelnut.  I’m sure there are others, too.  Just make sure you buy 100% nut spread to be sure the sly Mr P.O. hasn’t made his way in to the jar you’re consuming (or go to the link above for the guide).

3.  Tahini – a.k.a. sesame seed spread.

4.  Hummus.

5.  Extra virgin olive oil.  I’ve read about people freezing olive oil too, to turn it into a bit of a spread.

6.  Make your own olive oil and butter spread.  This is sooo simple.  And if you make it you know exactly what went into it.  Yes it contains butter.  But the butter is diluted considerably with the olive oil (to around 50% if you follow the quantities below).

Home-Made Olive Oil and Butter Spread

Combine 250g softened butter with  1 cup olive oil, and a little salt if you like,  in a food processor.  Or mix it up with a wooden spoon, whisk or hand beaters.  Just mix it up enough so that the butter and oil are blended together to a lovely, smooth consistency that looks like runny margarine.  

IMG_3970

IMG_3978

That’s it.  Nothing more.  

IMG_3977

Pour the mixture into a clean container and pop it in the fridge.  

IMG_3972

It  will firm up after an hour or so.  

If you like a firmer consistency and don’t mind the higher butter:oil ratio (the more butter, the naughtier) you can reduce the amount of oil to about 1/2 cup.  Anything less and it will be starting to resemble butter and be equally hard to spread.

Use a lighter oil if you’re not keen on a strong olive oil taste but if you’re an olive oil fan then go for extra virgin as it’s healthier.  You could also experiment with different plant oils.  I haven’t.  But I reckon macadamia or grape seed oil would be worth a try.  And of course, use certified organic ingredients if you can.

I’m planning to return to my days of spreadless bread.  Some time soon.  Really.  I will.  But in the meantime I’ll stick to the healthier and pro-orangutan choices.  What do you think?  Would you give one of the spread alternatives a go?  Or do you already use them? Or go without?

1 Comment

Filed under Eating, Living Green